WEBSITE UPDATE:
Due to the increased difficulty in people accessing this website and the sister, due to certificate issues from Yola, I am slowly migrating to Wordpress during 2023. These camera repair pages will remain here, but will no longer be updated.
For recent cine resource updates, please visit: https://aussiecine.wordpress.com/
For recent camera listings, please visit: https://aussiecinerepair.wordpress.com/
Kinor 16 These cameras were produced from the 70's to the 90's and were intended for professional use, either for studio or field work, news or content creation such as advertisements. The first Kinor 16-CX-1M came with variable shutter timing and a turret for three lenses. The second model, the 16 CX-2M came with fixed shutter angle and a single lens mount. There are websites with lots of information available HERE
Kinor 16 CX-2M This camera was bought in a non-running condition. The viewfinder was off the camera, the lens mount was broken, and the zoom lens winder needed repair. The following is a basic exploration of the camera and it's functions, repair where possible, maintenance where needed, and replacement of the power supply connection. There is a downloadable modern user manual for this camera on this page. The user manual covers in clear detail the use and functions of the camera. There is also below a very well made video detailing a full disassembly of a Kinor 16 CX-2M by T. Nakano.
Lubrication: Prospective D.I.Y lubrication should be researched well, as some cameras have very specific requirements, requiring specific oil and/or grease. For most of the camera maintenance i have done I use “Singer machine” oil, a very light viscosity oil suited for low load and speed applications, commonly used for sewing machines.
Note: As with all equipment such as old cameras, a qualified service person is ideally the first stop when owning a camera. If, however, a person is moderately confident and not heavy handed, basic maintenance will assist in keeping the camera running long enough for you to enjoy using it and then save up money to get it serviced.
Manuals

|
Kinor 16 CX-1M Russian original.pdf Size : 10661.814 Kb Type : pdf |
|
|
Kinor 16 CX-1M Manual English translation.pdf Size : 2127.31 Kb Type : pdf |
|
|
OKC lenses 6mm 150mm 200mm 300mm technical.pdf Size : 849.695 Kb Type : pdf |
|
|
Kinor 16 CX-2M user manual.pdf Size : 5245.27 Kb Type : pdf |
|
|
Kinor 16-CX 29EPSS motor English manual.pdf Size : 2871.575 Kb Type : pdf |
|
|
Using the Kinor 16 CX-2M.pdf Size : 3093.562 Kb Type : pdf |
The above user manual is an attempt to fill the gap between the technical original and day-to-day usage by an person who uses it rarely.
The video is very handy as it shows clearly the camera's inner parts, how they function, and interact with other moving parts.
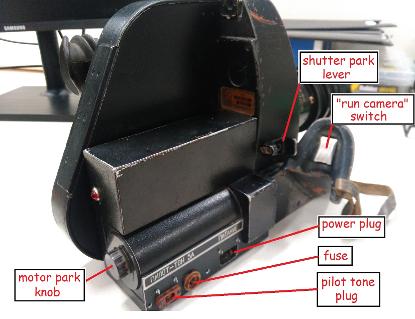
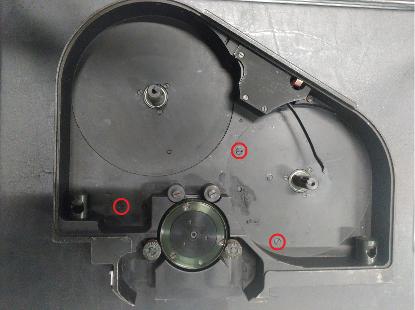
The above pictures are intended to briefly familiarise the reader to a few of the camera's functions. More detail is provided in the downloadable user manual available from the top of this page.
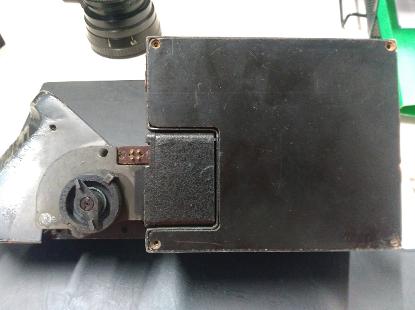
DISASSEMBLING THE KINOR CAMERA UNIT
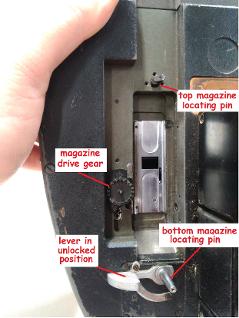
These four pictures simply guide the user in removing the motor and magazine from the camera body. The Kinor 16 camera, like other cameras of the same era, was based on the camera body that various motors and magazine sizes could be attached and detached quickly for cleaning or reloading to minimise interruption during filming.
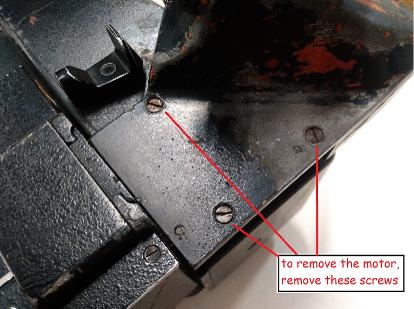

Once the three screws are loosened and removed, the motor can be gently disengaged from the camera body and removed. Pulling the motor to the side. Reassembly is the reverse, be sure the motor's , male socket lines up with the camera body female socket
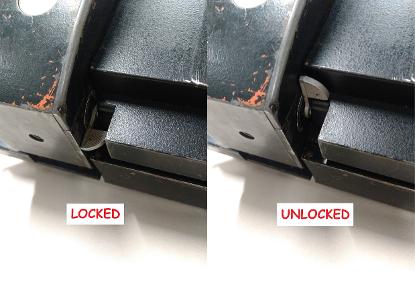

Next, removing the magazine simply requires the lever at the bottom of the camera to be raised, then the button pushed in and held in, on the side of the magazine, and slowly pull the magazine out of its cavity. Reassembly is the reverse, be sure to line up the camera body pegs with the magazine cavities.
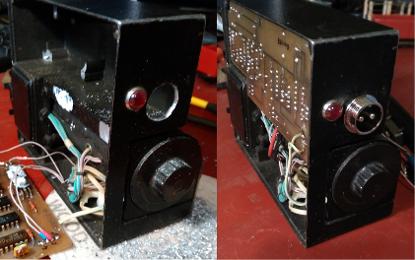
MOTOR EXAMINATION
Removing the four screws enables access to the rear of the motor and it's electronics. The back panel is similar to Bakelite and potentially brittle if mishandled.
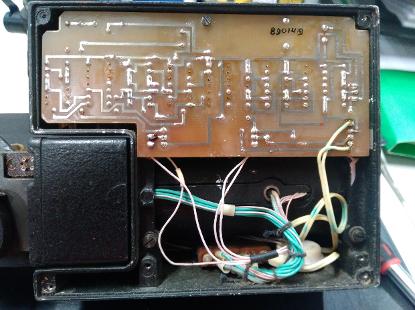
Examine the circuit board for corrosion. A corrosion inhibitor can be minimally applied with a Q tip. For example INOX MX3 aerosol is suitable for protecting circuitry.
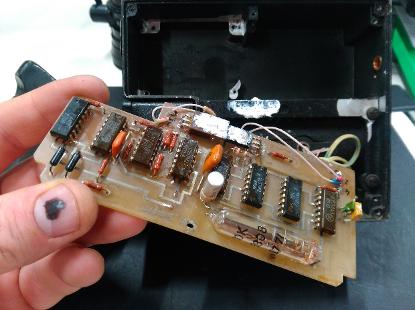
These components are irreplaceable and in all likelihood, a comparative component may not exist. If the board is damaged, a replacement will be extremely hard to locate.
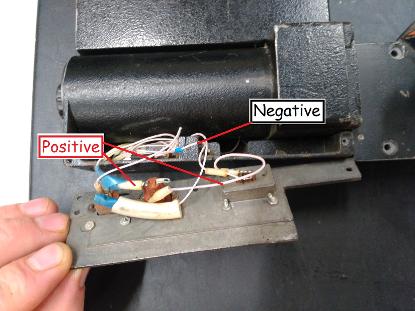
Removing the motor side panel exposes the power plug, fuse base, and pilot tone plug. If unsure of wiring, the Positive wire will always connect to a fuse, the Negative usually to body.
RE-WIRING THE POWER PLUG
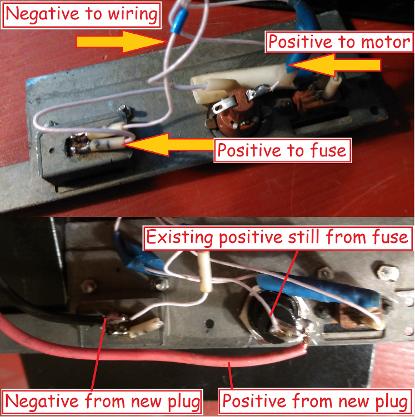
Apparently finding an original power lead, and getting a camera plug that is reliable to match, is like finding chicken teeth. A great suggestion from Olex was replacing the original plug with a modern XLR or equivalent. The process is moderately simple. If a new fuse holder is needed, simply install a new one, solder a new positive wire to the side of it, solder the old positive to the top of the fuse, and solder a new negative wire to the existing earth wire soldered to the original power plug. A modern fuse holder might be slightly larger and deeper than the original. Use a round file to enlarge the hole, purchase a short mini fuse if positble.
Depending on the power connector you purchase, use a drill bit the same size, remove the existing circuitry by unscrewing and placing safely aside, then with a slow drill, and holding the motor with your hand, slowly drill a hole. Do not put the motor in a vice. Use the drill on the slowest setting. Soft metal does not need hard work to drill, just patience. Once finished, install the new plug, route the new wiring from the old plug, and double check before connecting to a 12 volt battery.
Warning: According to Olex, if power is supplied to the motor incorrectly, the motor will burn out and I guess will be very expensive to repair, or almost impossible to replace. With all D.I.Y wiring, double check, make notes, do drawings, and use a simple tester to make sure it is correct.
VIEWFINDER CLEANING
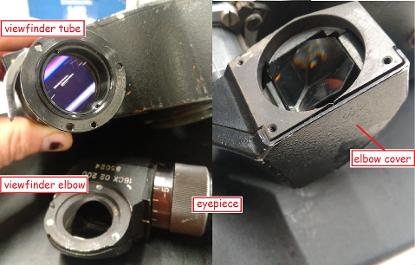
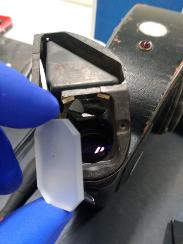
When handling any glassware, wear latex gloves. Grease/oil from skin can cause fungus growth at worst, finger prints at best.
The whole viewfinder assembly can be easily dismantled and the glassware easily reached for cleaning. The viewfinder is in three parts, at each fastening point, dust can easily enter. For future dust-proofing, apply a small bead of not-hardening black silicon to each fastening point. Clean glass with appropriate solution and microfiber cloth.
MAGAZINE DISASSEMBLY
To check and lubricate the magazine, remove the cover, then remove the three indicated screws. Gently turn the magazine over.
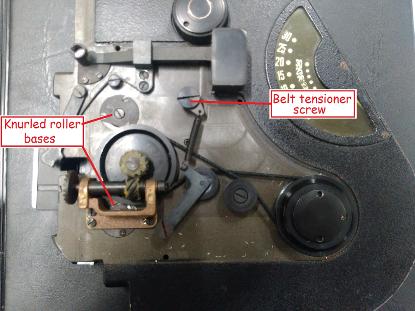
Only adjust the belt tensioner if the film take-up spool is judged to be out of sync. If the drive cog needs re-greasing, use a Lithium or non-petroleum grease. If lubricating anything here, use minimal amounts of oil, ie: a drop and then wipe off excess.
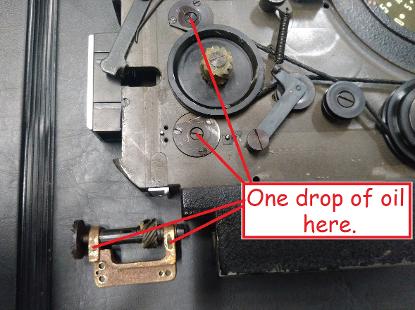
By removing the three screws securing the drive cog, clear access can be obtained to lubricate both knurled roller bases. If a drop of oil fails to loosen, then remove, clean, and re-lubricate.
Apply a drop of oil to each felt pad located on the drive cog chassis. The tiny felt pads will distribute and hold lubricant, and quieten the drive cog better.
DISCLAIMER:
This is a Copyright Disclaimer under section 107 of the Copyright Act of 1976, allowance is made for “fair use” for purposes such as criticism, comment, news reporting, teaching, scholarship, education and research. Fair use is a use permitted by copyright statute that might otherwise be infringing.Fair Use permits limited use of copyrighted material without having to first acquire permission from the copyright holder. Fair use is one of the limitations to copyright intended to balance the interests of copyright holders with the public interest in the wider distribution and use of creative works by allowing as a defense to copyright infringement claims certain limited uses that might otherwise be considered infringement.
The creator of this website declares that information and photographs copied from other websites and placed here is solely for the purpose of education and research. The creator of this website does not earn money from information published here. The creator of this website always references, where possible, the original creator of work that is published here.
If any person wants to dispute this, and/or believes the creator of this website has infringed on a person's copyrighted creative material, please email me at mishkin.film@gmail.com
This email address is checked frequently.