WEBSITE UPDATE:

Due to the increased difficulty in people accessing this website and the sister, due to certificate issues from YolaI am slowly migrating to Wordpress during 2023.  These camera repair pages will remain here, but will no longer be updated.

For recent cine resource updates, please visit: https://aussiecine.wordpress.com/

For recent camera listings, please visit: https://aussiecinerepair.wordpress.com/

Mishkin Productions "Using 16mm" page - Many handy links to Bell & Howell cameras

Lubrication:  Prospective D.I.Y lubrication should be researched well, as some cameras have very specific requirements, requiring specific oil and/or grease.  If you do not know what is needed, stop until you know.  Do not use automotive products, or petroleum based greases as some plastic parts may “melt”.  
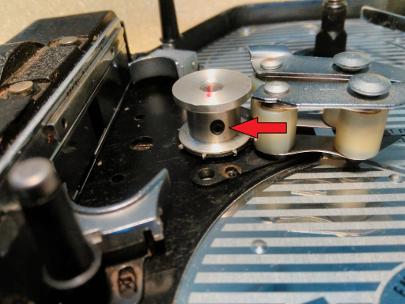
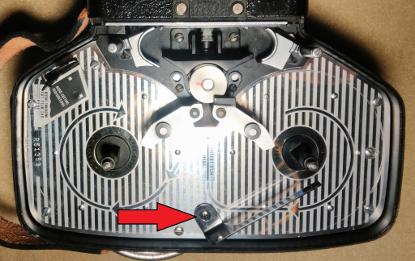
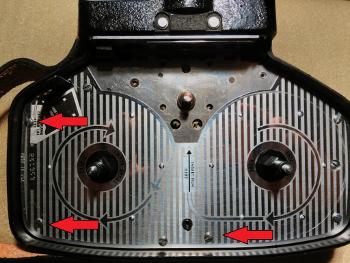
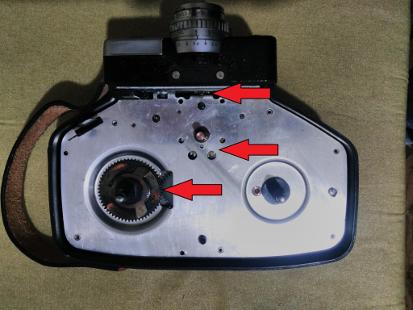
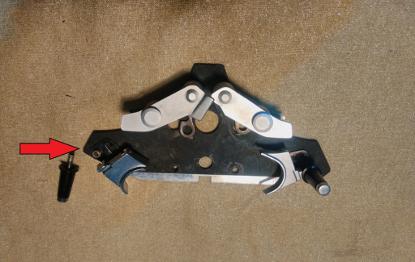
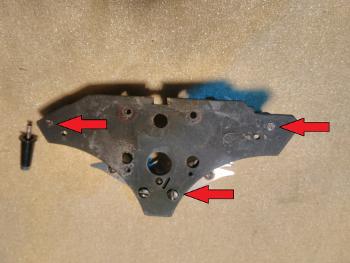
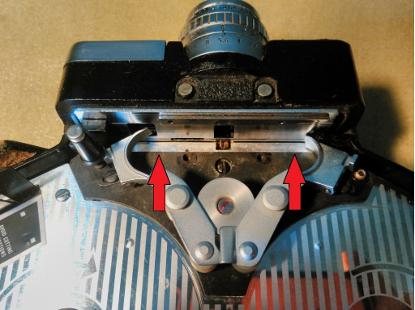
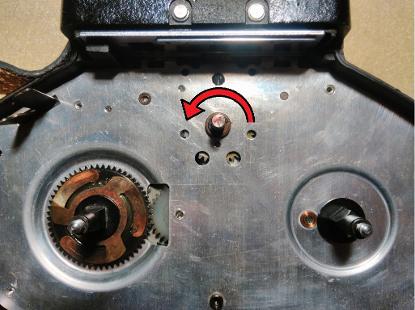
Lubrication of this camera was done using a “Q” tip, or ear bud dipped in light oil, and gently dabbed where needed.  Excess oil was wiped off.  Lubrication should only be used sparingly on 
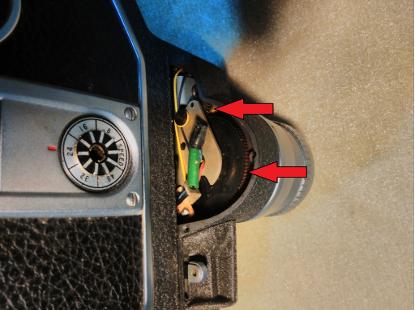
areas where metal parts rub against each other, such as bearings or worm gears.  Gears that only touch other gears via teeth will not need lubricant.  Plastic gears or moving parts may require lithium grease, or similar.

Note: As with all equipment such as old cameras, a qualified service person is ideally the first stop when owning a camera.  If, however, a person is moderately confident and not heavy handed, basic maintenance will assist in keeping the camera running long enough for you to enjoy using it and then save up money to get it serviced.

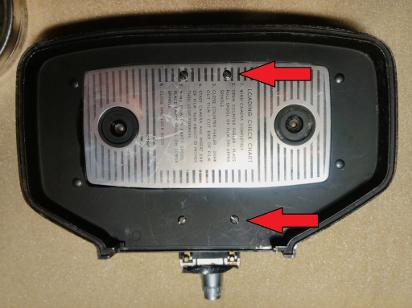
CAUTION! When working on a spring winding camera always ensure the spring is run down entirely.  Not only is it potentially dangerous to work on anything with a coiled spring inside, the camera motor accidental running a few hundred frames could mess up your marking needed for reassembly.


Manual

Bell & Howell 240EE user manual.pdf Bell & Howell 240EE user manual.pdf
Size : 1486.992 Kb
Type : pdf
First remove the two screws indicated, they act as a guide for the removable film pressure plate.  Gently wiggle it free.  Secondly remove the film advance cog.  See image on right.  the remaining five screws are easily seen, remove in any order and gently lift away the plate.


To remove the film advance cog, use a small blade screwdriver to remove the indicated grub screw.  Be mindful to mark on top of the cog it's position.  Placing it back incorrectly may affect the way the film advance claw moves the film forward. 


Next remove the "film remaining" arm. 


Once the film movement plate in removed, the remaining seven screws are easily identified.  One screw is longer, this goes next to the film cutter, indicated by the top left arrow.


Without going further into dismantle, place a minimal amount of lubricant in the indicated areas.  Be mindful to use a minimal amount of oil of appropriate viscosity, for instance Singer Sewing Machine Oil.


Removing these four screws will enable the parallax to be removed.


The parallax viewer needs not be removed unless it needs replacing entirely.  The circuit at the left of the viewer is connected to a small diode and activates when the "Electric Eye" senses the exposure to be too low to safely record an image.


The eyepiece unscrews to enable adjustment.  To remove unscrew fully and gently pull from the parallax viewer body.  This enables cleaning.  Note: the eyepiece shown here has been adapted by a previous user.  The standard eyepiece is removed similarly.


In the event that the loop former press pole breaks off, it needs to be replaced as it is important that the loop formers lift away from the film path as the camera's film door is screwed into place.  If not, the film will rub against the former, scratching the film and possibly becoming jammed.


On the reverse side of the film plate, the poles and film arms can be unscrewed for cleaning or replacement.


When reattaching the film plate, be sure to place the crimped metal strip back into it's groove.  Some editions of the 240EE may not have this metal strip.


When placing the strip back into it's groove, be sure to install with the crimps facing upwards.  This is to prevent the film pressure plate moving side to side while rolling film.

 
THE "ELECTRIC EYE" FUNCTION

The "EE" function of the camera enables automatic adjustment of the camera iris as the "EE" mechanism detects changes in light, therefore changing the exposure.  When the camera was new, the mechanism worked very well, however over 30 or so years, oxidised electrical contacts, and hard to source correct voltage batteries, trying to use the "EE" feature may be more problematic than simply using an external light meter.  These two links may assist: Photo.net and Photography.com


Undoing the indicated screws will remove the "EE" mechanism cover.  Be aware the screws are tiny and will easily fall into the cavity if you are not careful.


In this picture there are several cogs visible. 

 
OVER-WOUND SPRING MOTOR

Although most people take great care when winding a spring, occasionally when one is overwound, the mechanism jams.  One such camera I obtained due to this.  Thankfully I was able to "coax" the spring to unwind by using the below technique. 


Relieving the pressure of an over wound spring, in this instance, was managed by placing the blade of a screw driver against one of the cog teeth and gently twisting the screwdriver so that it supplies a small amount of pressure against the cog indicated in the picture.  The cog, under normal operation, rotates anti-clockwise.  Do not apply any force to the nylon cog, doing so may damage it and render the camera inoperable.  Relieving pressure can be done by gently turning the cog in it's normal direction in the hope that doing so will release the spring.  Set the FPS dial to no more than 24.  The spring may unwind unevenly or "gluggily" due to age hardened grease or a build up of grease, dust, or oxidisation.  Apply a very small amount of lubricant as per above directions. 

 
DISCLAIMER:
This is a Copyright Disclaimer under section 107 of the Copyright Act of 1976, allowance is made for “fair use” for purposes such as criticism, comment, news reporting, teaching, scholarship, education and research. Fair use is a use permitted by copyright statute that might otherwise be infringing.

Fair Use permits limited use of copyrighted material without having to first acquire permission from the copyright holder. Fair use is one of the limitations to copyright intended to balance the interests of copyright holders with the public interest in the wider distribution and use of creative works by allowing as a defense to copyright infringement claims certain limited uses that might otherwise be considered infringement.

The creator of this website declares that information and photographs copied from other websites and placed here is solely for the purpose of education and research.  The creator of this website does not earn money from information published here.  The creator of this website always references, where possible, the original creator of work that is published here.

If any person wants to dispute this, and/or believes the creator of this website has infringed on a person's copyrighted creative material, please email me at mishkin.film@gmail.com
This email address is checked frequently.