WEBSITE UPDATE:
Due to the increased difficulty in people accessing this website and the sister, due to certificate issues from Yola, I am slowly migrating to Wordpress during 2023. These camera repair pages will remain here, but will no longer be updated.
For recent cine resource updates, please visit: https://aussiecine.wordpress.com/
For recent camera listings, please visit: https://aussiecinerepair.wordpress.com/
Mishkin Productions "Using 16mm" page - Many handy links to Cinema Products cameras
Cinema Products CP16A & CP16R
Whitehouse Audio Visual: This company is in California and specialises in the sales, parts, and servicing of CP16 cameras and accessories, as well as other products. They are very helpful, having years of experience on the CP, they are also reasonably priced.
Dismantle: The Cinema Products 16, or CP16, can be easily dismantled to gain access to parts that may need servicing or replacement. Removing the camera body side cover and general work is covered in the videos below. Watching them will offer a decent understanding of general examination. There is a section on repairing a seized viewfinder and also replacing the clutch pads, spares of which come with the belts when purchased from Whitehouse Audio Visual. Might as well do them at the same time..
Battery Pack: The CP16 battery packs only last a few years and need replacement or re-celling. You can search locally to find someone to do it, or purchase one already made for USD$175 from Whitehouse Visual. If a person is able to solder skillfully, then the battery pack can be re-celled by purchasing rechargeable batteries with solder tabs from auction sites or electronics stores. Depending on the condition of the donor pack and electrical connections, a brand new pack may be less trouble.
Note: As with all equipment such as old cameras, a qualified service person is ideally the first stop when owning a camera. If, however, a person is moderately confident and not heavy handed, basic maintenance will assist in keeping the camera running long enough for you to enjoy using it and then save up money to get it serviced.
The videos linked below can be found here: https://www.youtube.com/user/tonyn24play/featured
Manuals

|
Cinema Products CP-16R User and Maintenance Manual.pdf Size : 9015.172 Kb Type : pdf |
|
|
CP-16R Technical Manual.pdf Size : 5220.494 Kb Type : pdf |
|
|
evergreen_edu.pdf Size : 75.627 Kb Type : pdf |
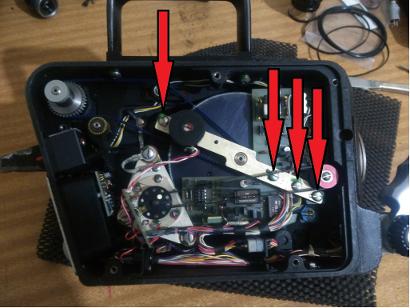
As per the above videos, removing the 4 screws enables access to the 'blue' belt, the one most likely to be falling apart. Remove the black belt by rolling it off the cog on the far right.
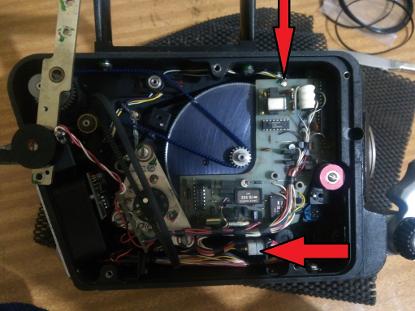
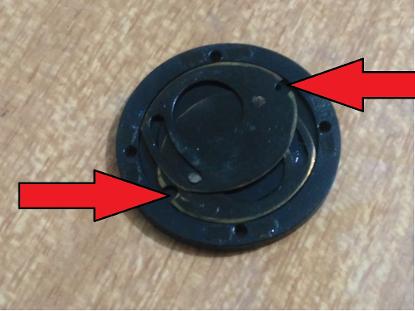
Once the bar is held aside, replacing the blue belt is relatively easy. To check condition of the circuit board simply unscrew the small screw as per the arrow, and slowly maneuver the board clear of the camera body. Disconnecting the wiring plug, as per lower arrow, is quite easy and will help in board removal.
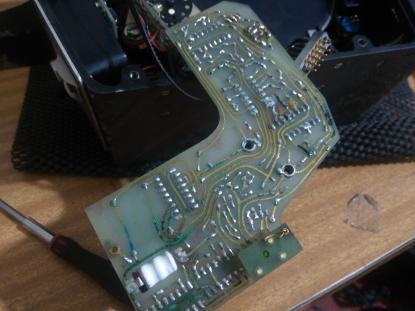
Once the board is clear of the camera body, turning it over reveals normal corrosion caused by oxidisation, the green build up on the circuits. Removing the corrosion may restore full function back to the camera. However, the chips used on the boards may also have failed and require professional examination and possible replacement.
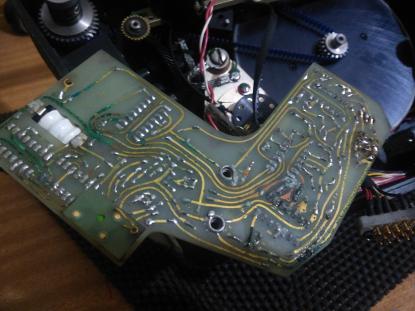
Removing corrosion from circuitry is a straight forward process if done carefully. Following are links to sites that clearly instruct on how to clean a board safely: Wikihow and Techwalla. Keep in mind, if oxidation has gone deep enough to corrupt the circuit no amount of cleaning will fix it. Take the board to an electronics professional.
VIEW FINDER REFURBISH/REPAIR
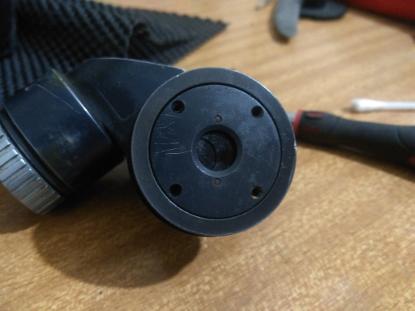
By removing the 4 screws you can lift away the viewfinder 'douser' for cleaning in the event it sticks or is jammed.
Once cleaned and lubricated place the shutter blades back in position. The indicated cut aways line up with the pins of the 'douser' adjusting ring in the following picture.
Once the blades have been cleaned and lubricated, place the reassembled 'douser' into your palm and lower the eye piece onto the 'douser' turning the douser upside down may make the blades fall out and need to be placed back in the right order.
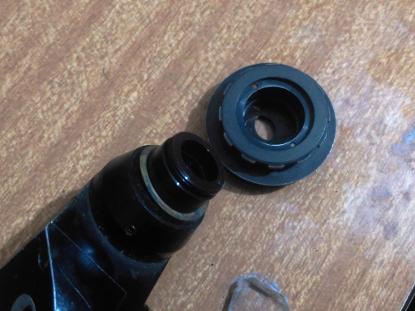
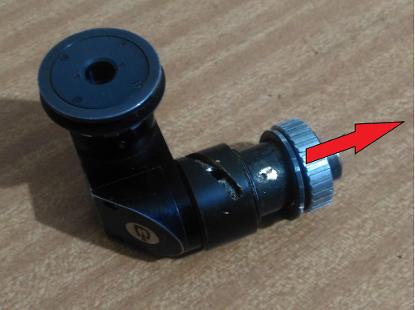
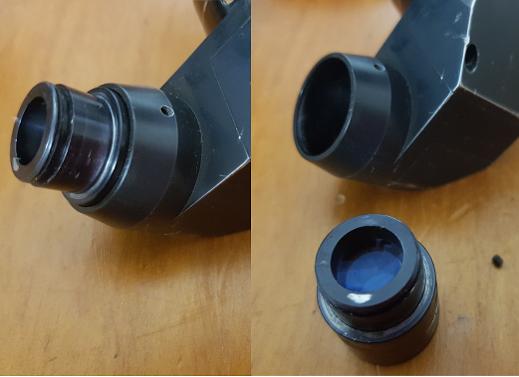
If the 'douser' is fully functioning and does not need cleaning, simply unscrew the whole assembly to gain access to the view finder glass to enable cleaning.
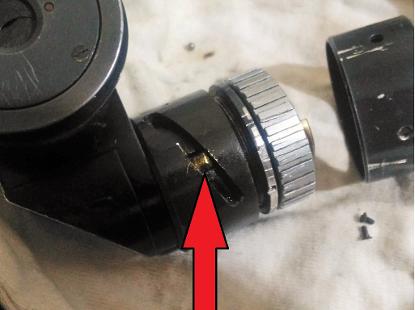
In the event that the diopter cannot move back and forth or loses it's adjustment, the metal sheath can be unscrewed and slid off. As per the indicating arrow, there is a brass screw that enables the diopter to travel in and out without falling apart. ensure the screw moves freely, adding a small touch of lubricant only.
Once the brass screw is removed, the one here had to be drilled out, a small ball bearing will then drop out and the sliding tube can be removed, sometimes with gentle persuasion. The ball bearing remains in the groove and can be held in place with a little grease.
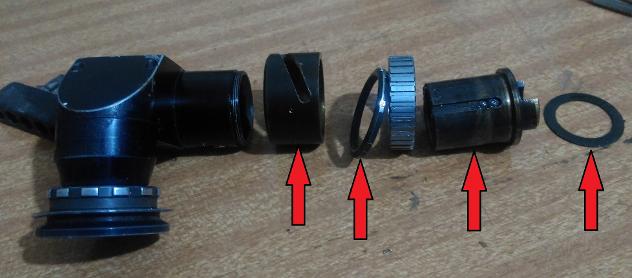
Once disassembled clean all parts and lightly lubricate with a touch of grease or drop of light oil. The brass collar, far left, needed deburring on the inside as the soft brass had been gouged by a seized knob. The sliding tube, second from right, gets re-greased or oiled and will slid much smoother. Included is a small shim.
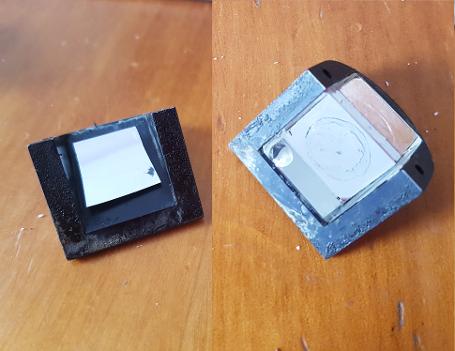
VIEW FINDER PRISM REPAIR
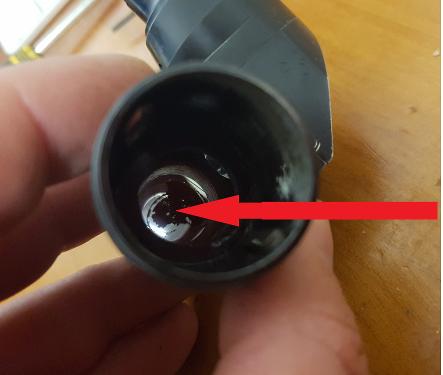
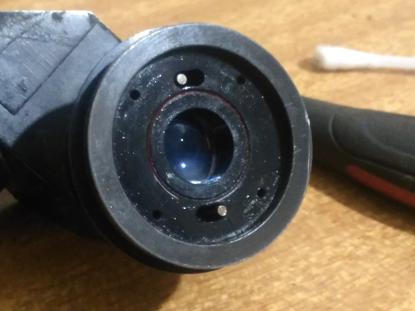
Looking through the viewfinder one can see a large black corrosion or smudge. After cleaning the lens parts that can be reached, without effect, disassembly is next.
Remove the small grub screw and slide out the remaining lens element.
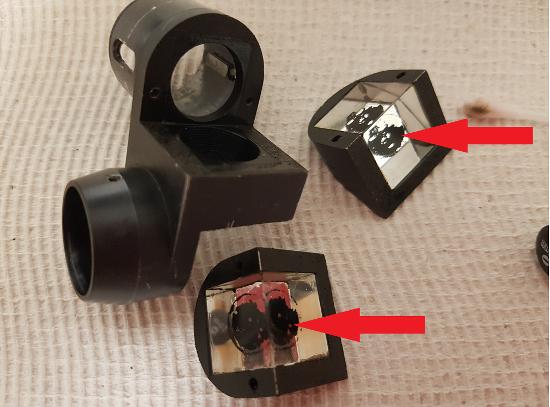
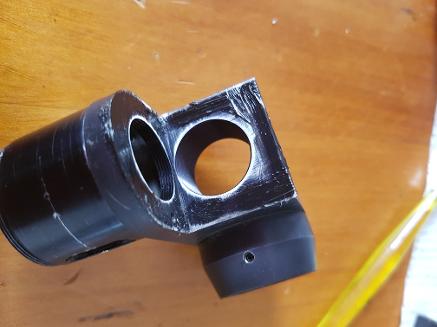
Next, dismantle the viewfinder. Remove the 4 screws, 2 on each elbow. Each elbow is very hard to remove. I used nail polish remover which is an ideal glue weakener, and a Q tip to dab solvent along the elbow joints. After letting the solvent seep into the elbow joints for a minute or two, I then used the plastic end of a screwdriver to tap the elbows off the viewfinder. Looking at the the black corrosion, via the arrows, the problem is clear.
The pyramid shaped glass is not glued in, but sits on an adhesive pad and is a very snug fit in the metal elbow. Do not use anything to lever them out, they are glass and will break. Use the plastic end of a screwdriver and attempt to tap the glass from the metal body. Be sure to tap in the direction that the glass can go. The glass will slide out either side.
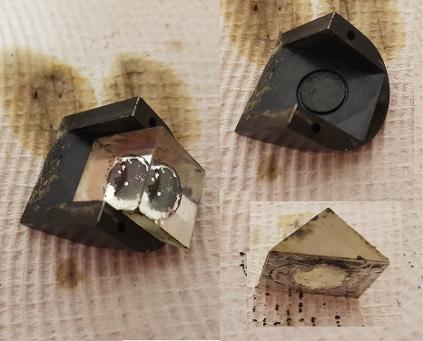
Once the glass surfaces are cleaned up, it seems the silver paint that was originally applied to create a mirror backing has corroded off, in the same shape as the adhesive pad that the glass sits on. Seems the pad erodes the silver paint. Re-applying a type of mirror finish paint or tint is required.
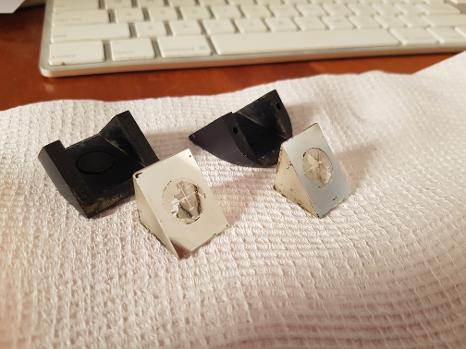
Initially I experimented with a few items to replace the eroded silver paint. First I tried silver model paint, but it was no good, not reflective enough. I tried cutting glass from a mirror, but the thickness of the glass altered the magnification path and had to be abandoned. I tried silver cellophane, which worked very well, however, small imperfections in the cellophane distorted the magnified image and failed to accurately display an image. Had to be abandoned too. I will next try mirror finish paint.

Next I tried Rust-Oleum 'Mirror Finish' spray paint. I was a little dubious as to how well it would work. Cleaning up the prism, I applied 5 thin coats, around a minute apart, at a distance of 30 centimetres. After around 15 minutes it was dry, I waited a few hours for it to harden before handling it. Note: A youtube video suggested not touching the dry paint as it will leave an imperfection that will be noticeable, even when dry.
Once the prisms were able to be handled I re-installed them in the metal viewfinder elbows and tested the results. I was very impressed with the final product. I could not see any issue with the result, and the reflections appeared almost perfect. I considered that until the reflected image could be seen under magnification, I would not get too excited.
Once the viewfinder was re-assembled I lit a small scene with a lamp, making sure I had some vertical lines in the frame. All in all I was very happy with the result. The areas where the corrosion had been replaced with spray paint were very hard to see. As with all film shooting, ensure the diopter is set properly for the camera person's eye, and use a tape measure for setting focus if unsure of the image seen in the viewfinder.

The surfaces that the elbows mate to will have left over glue. This should be removed to ensure close mating surfaces. Use nail polish remover or a light grade sandpaper. Only sand enough to remove the glue, not the metal.
Prior to re-attaching the elbows with the repaired silver paint backing, use a small paint brush to apply a very thin layer of general purpose silicon to help provide a seal against dust once the viewfinder is re-assembled. Use a paper towel to wipe of execss. Only a VERY thin layer is needed.
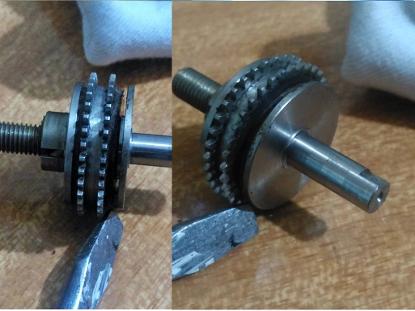
MAGAZINE DRIVE PULLEY REFURBISH
When you order the CP16 replacement belt kit from Whitehouse Audio, it will come with textile washers and grease. Use this when rebuilding the magazine drive cog. It is a fairly simply process that will help reduce noise while the camera is under operation.
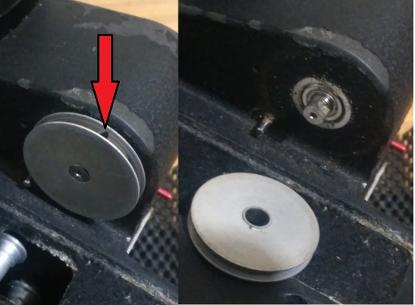
Using a very small allen key, undo the tiny screw securing the pulley onto the shaft, gently slide the pulley off.
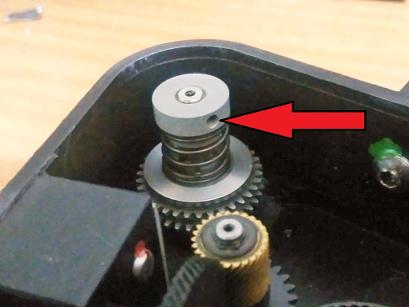
Using the same allen key, remove the tiny grub screw securing the end nut.
Holding the cog with one finger, unscrew the end nut, the spring is quite strong, but will not "fly off"
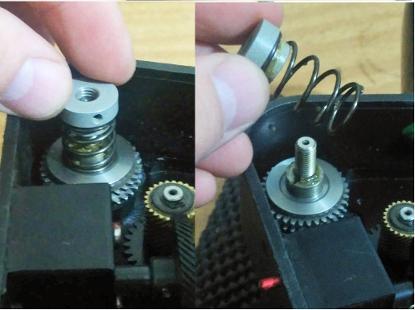
Now the cog assembly should lift away easily.
Looking closely at the cog, you can see the original textile washers and the small gap that exists in the assembly.

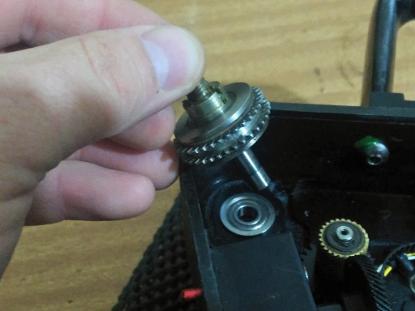
Using an appropriate tool, a small pin driver, push the pin out from either side using a small weighted tool, eg: a large screw driver handle. To remove the pin use minimal force, a hammer is too much. Once most of the way through use pliers to gentle remove the remainder of the pin.
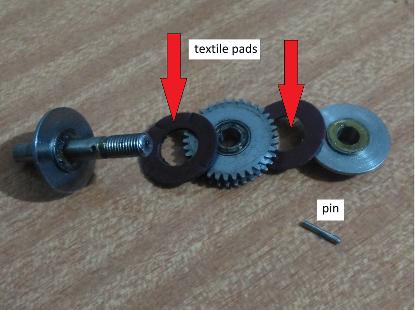
Once the pin is removed disassembly is straight forward. Do not lose the pin. The textile pads are indicated, be sure to reassemble in this order. Reassemble by reversing disassembly.
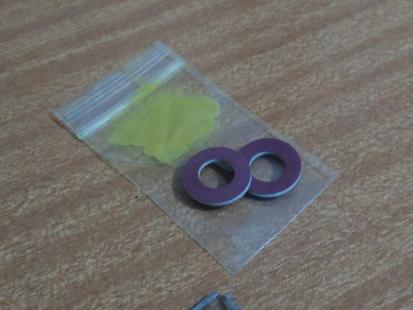
When you order the CP16 replacement belt kit from Whitehouse Audio, it will come with the above textile washers and grease. Use this when rebuilding the magazine drive cog.
DISCLAIMER:
This is a Copyright Disclaimer under section 107 of the Copyright Act of 1976, allowance is made for “fair use” for purposes such as criticism, comment, news reporting, teaching, scholarship, education and research. Fair use is a use permitted by copyright statute that might otherwise be infringing.
Fair Use permits limited use of copyrighted material without having to first acquire permission from the copyright holder. Fair use is one of the limitations to copyright intended to balance the interests of copyright holders with the public interest in the wider distribution and use of creative works by allowing as a defense to copyright infringement claims certain limited uses that might otherwise be considered infringement.
The creator of this website declares that information and photographs copied from other websites and placed here is solely for the purpose of education and research. The creator of this website does not earn money from information published here. The creator of this website always references, where possible, the original creator of work that is published here.
If any person wants to dispute this, and/or believes the creator of this website has infringed on a person's copyrighted creative material, please email me at mishkin.film@gmail.com
This email address is checked frequently.